
In this article 8
Growing mushrooms at home is not complicated, but it is unlike anything familiar from gardening. No seed, no photosynthesis, no sunlight: an organism is placed in material that it will decompose, and then it is given a signal to fruit.
This guide covers indoor cultivation of easy species — those that produce within a few weeks to a few months, without a garden or tree. This is where you should start, even if your ultimate goal is a truffle orchard: you will understand the complete cycle in a single season.
The two-stage principle
Every mushroom cultivation process consists of two stages, and that is the key to everything.
- Colonization — the mycelium spreads through the substrate. It needs darkness, warmth, limited air exchange, and stable humidity.
- Fruiting — a change in conditions is induced to signal to the mycelium that it is time to produce. It then needs indirect light, fresh air, high ambient humidity, and a slightly lower temperature.
These two sets of conditions are opposites. This explains the two most common failures: opening and humidifying too early, which slows colonization and invites contamination; or never changing the conditions, which produces a perfectly white substrate that will never yield anything.
To understand what mycelium is and how to preserve it, see All About Mycelium.
Choosing your species and substrate
Each species has its preferred materials. Choosing the wrong species–substrate combination means failing from the outset.
| Species | Substrate | Conditions | First harvest |
|---|---|---|---|
| Oyster mushroom | Straw, coffee grounds, cardboard, log | 15–20 °C, very tolerant | 3 to 6 weeks |
| Button mushroom | Pasteurized compost or manure | Complete darkness, cellar or dark room | 2 to 3 months |
| Wood ear mushroom | Hardwood log, sawdust | High humidity | 2 to 4 months |
| Shiitake | Oak or beech log, enriched sawdust | Shaded outdoor area or cellar | 6 to 12 months |
Start with oyster mushrooms. They forgive mistakes, colonize quickly, and coffee grounds make them the most accessible option for apartment growing.
Prepare the substrates
- Straw — cut it into 5 to 10 cm pieces, then pasteurize it: soak for one hour in water at 70–80 °C, then drain thoroughly. The aim is not to sterilize it but to eliminate competitors.
- Coffee grounds — already pasteurized through extraction. Two conditions are essential: use them fresh, within 24 hours, and place them in a perforated opaque container. Beyond that, they become contaminated very quickly.
- Brown cardboard — unprinted, soaked and then wrung out, in alternating layers with the mycelium. A zero-waste solution, reserved for oyster mushrooms.
- Hardwood log — freshly cut oak or beech, never dry wood or wood already colonized by other mushrooms. Drill holes, inoculate, and seal with wax.
- Pasteurized compost — for the white button mushroom, in trays kept in the dark.
Phase 1 — colonization
- Inoculate according to the form of mycelium you have — the liquid mycelium protocol is detailed in Succeeding with cultivation from liquid mycelium.
- Mix thoroughly to distribute the strain throughout the entire mass: the more starting points there are, the faster colonization will be and the less time contaminants will have to establish themselves.
- Compress moderately — enough to eliminate large air pockets, but not to the point of suffocating it.
- Keep it in the dark, between 20 and 24 °C for most saprophytes.
- Do not open it. Every handling is an opportunity for contamination. Resist the urge to check every day.
What you should see: white growth spreading from the inoculation points in cottony filaments. Allow 10 to 21 days for a bag or tub, and several months for a log. The phase is complete when the substrate is completely white.

Phase 2 — triggering fruiting
Once the substrate is white, reverse everything.
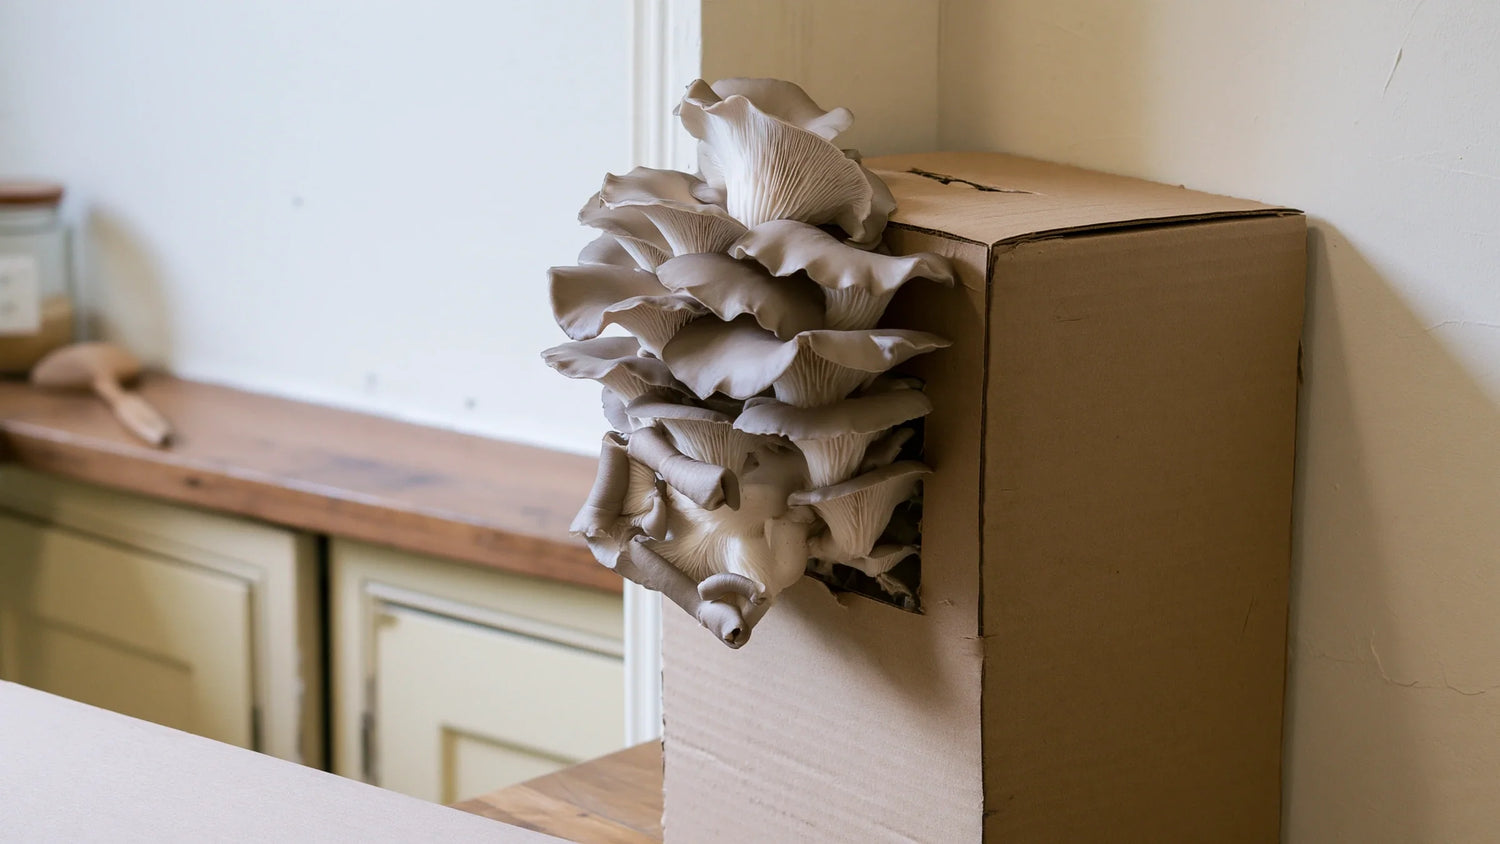
- Open or cut into the container to create the areas where the mushrooms will emerge.
- Indirect light — a lit room is sufficient; never direct sunlight. Mushrooms do not photosynthesize: light is only a signal, and it guides growth.
- High humidity — mist once or twice a day. Spray the air around them rather than directly onto young primordia, which rot easily.
- Fresh air — ventilation becomes essential. This is the factor beginners neglect most.
- Temperature drop — a few degrees lower, around 15–20 °C. For shiitake grown on logs, soaking for 12 to 24 hours in cold water serves as a trigger.
The first primordia — small white pinheads — appear within a few days, then grow very quickly: from pinhead to harvestable mushroom often takes three to five days. Monitor them daily at this stage.

Harvesting and triggering a new flush
Mushrooms grow in flushes: several successive harvests, spaced one to two weeks apart, with the mycelium resting between each one.
- Harvest before the cap flattens completely, when the edges are still slightly curled under.
- Twist and gently pull at the base rather than cutting: a stump left in the substrate will rot.
- Harvest the entire flush, even the small ones — they will not grow any larger and will delay the next flush.
- Between flushes: rehydrate the substrate, return it to darkness for a few days, then trigger fruiting again.
- Storage — 2 to 5 days in the refrigerator in a paper bag, never in a sealed plastic bag. Drying produces excellent results for shiitake and wood ear mushrooms, whose flavor becomes more concentrated.
Spent substrate can be added to the compost or used as mulch. It may even start growing again outdoors, at the foot of a hedge.

Troubleshooting
| Symptom | Cause | What to do |
|---|---|---|
| Green or black mold | Contamination — poorly pasteurized substrate, unclean handling | Isolate immediately. Localized outbreak: remove it. Widespread: substrate lost |
| Nothing after three weeks | Too cold, or weakened mycelium | Check the temperature — below 15 °C, colonization is very slow |
| White substrate, no fruiting | Signal not given | Open to indirect light, humidify, ventilate, lower the temperature |
| Long stems, small caps | Excess CO₂, lack of fresh air | Ventilate more |
| Dry, cracked mushrooms | Air too dry | Mist more often and protect them from warm drafts |
| Primordia turning black and drying out | Humidity shock or water sprayed directly onto them | Mist the surrounding air, not the young caps |
| Sour smell, slimy substrate | Bacterial contamination, excess water | Lost. Reduce humidity and improve drainage next time |
| Fungus gnats | Substrate too wet and exposed | Ventilate, reduce surface humidity, use yellow traps |
Frequently asked questions
Is a dedicated space necessary?
No. A cupboard, cellar, bathroom, or simple kitchen corner is enough for oyster mushrooms. Button mushrooms require complete darkness, so a cellar or garage is preferable.
Can they be grown year-round?
Indoors, yes: saprophytes do not depend on the season but on temperature, which you control. The easiest period remains autumn and winter, when the ambient air is cooler.
Does coffee grounds really work?
Yes, for oyster mushrooms, and it is the most economical solution for an apartment. Two non-negotiable conditions: coffee grounds less than 24 hours old, and a perforated opaque container for ventilation.
How many harvests can be expected?
A block or bag generally produces one to three flushes, with the first being the most abundant. An inoculated log produces for three to six years, with one or two flushes per year.
Are cultivated mushrooms safe to eat?
Yes, as long as you start with an identified strain and the culture is not contaminated. That is precisely the advantage of cultivation over foraging. If the substrate smells bad or is moldy, do not consume it.
Can wood found in the forest be used?
Only freshly cut, healthy hardwood. Wood that is already dry or colonized by other fungi will not work: your strain will lose the competition. Also check that harvesting is permitted.
Key takeaway
Two phases, two sets of opposite conditions: darkness, warmth, and stillness for colonization; indirect light, cool temperatures, humidity, and air for fruiting. Start with an oyster mushroom on coffee grounds or straw — a few weeks are enough to understand the full cycle, and everything else is then simply a matter of substrate and patience.
Taking it further
- Successfully growing from liquid mycelium
- Everything you need to know about mycelium
- Growing wild mushrooms
- Growing rare mushrooms: morels, truffles, and porcini
Discover our mushroom and mycelium collection — oyster mushrooms, shiitake, button mushrooms, and wood ear mushrooms to get started.

Leave a comment
This site is protected by hCaptcha and the hCaptcha Privacy Policy and Terms of Service apply.