
In this article 9
The mound has become the archetypal image of permaculture, to the point that it is often built without asking what purpose it serves. Yet it is a situational technique, and above all: there are two opposing forms, one of which is systematically overlooked.
The mound built above ground drains and warms. The buried mound, on the other hand, retains water. These are two responses to two opposing problems, and this initial choice determines everything that follows.
The common principle: wood as a sponge
Whatever form is chosen, the core of the process is the same: decomposing wood buried beneath the growing area.
This wood behaves like a sponge: it absorbs rainwater and releases it slowly during dry periods. As it decomposes, it gradually releases nutrients and creates lasting porosity, colonized by the fungal network. This is what distinguishes a true mound from a simple raised pile of soil.
What differs between the two forms is where this sponge is located in relation to ground level — and therefore whether it is exposed to evaporation or protected by the soil.
Two forms, two opposing objectives
The raised mound — for drainage
The wood and organic layers are built above the existing soil. The result is a 30- to 60-cm-high ridge.
- It drains — the root zone is elevated, allowing excess water to drain away. This is the number-one argument on clay soil, where winter root suffocation ruins crops.
- It warms up earlier — an elevated mass, exposed on its sides, gains two to three weeks in spring. This is decisive in cool regions.
- It increases the cultivable area — about 30% more than a flat bed with the same footprint, thanks to the sides.
- But it dries out — that same exposed surface means greater losses through evaporation and wind.
The buried mound — for retaining water
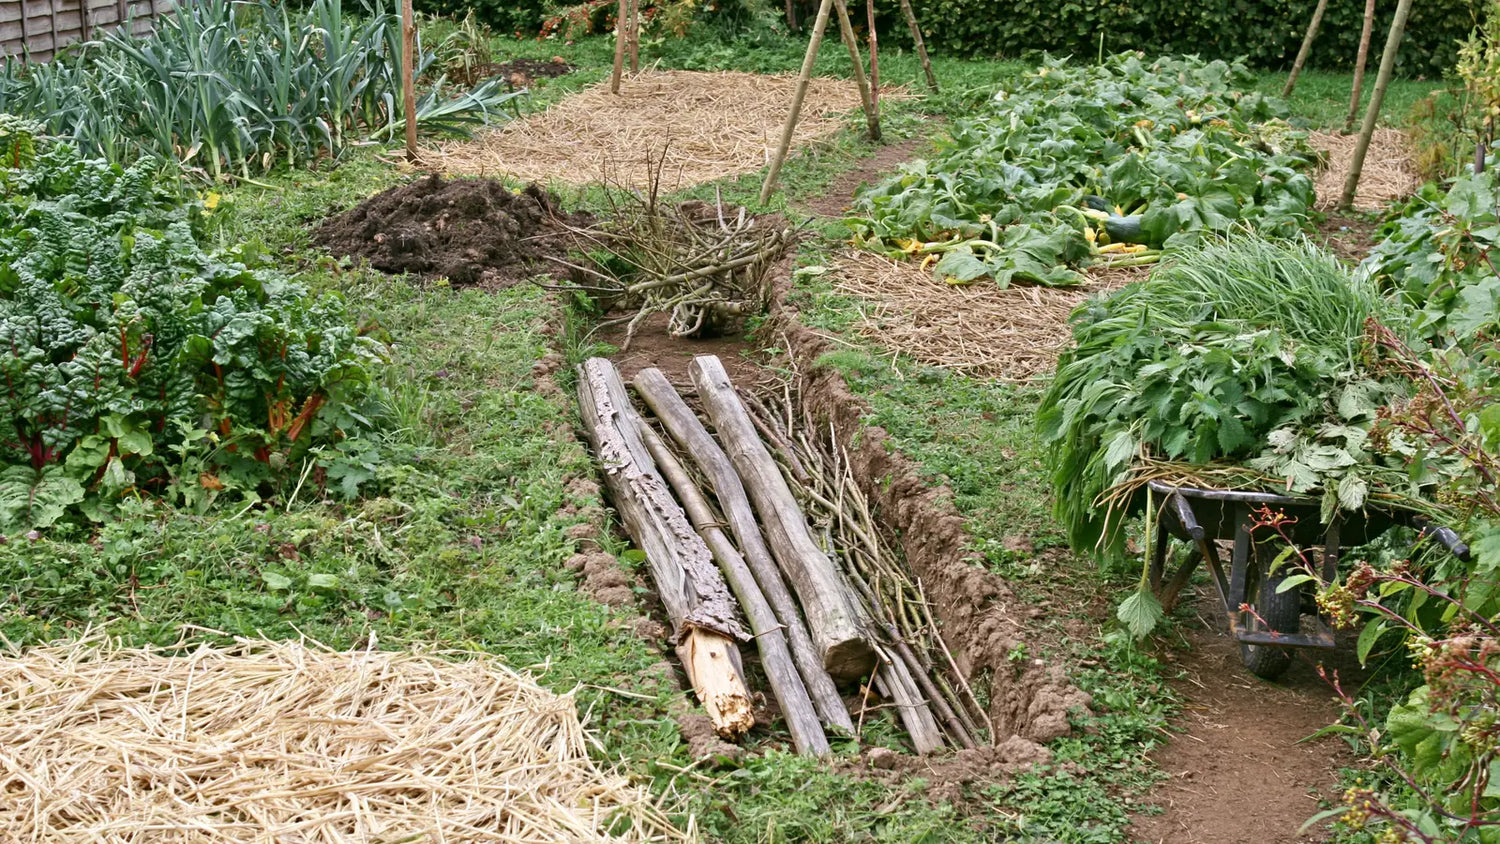
The wood is placed below ground level, in a trench, then covered with the excavated soil. The result is level with the ground or slightly rounded — it is no longer really a mound, and that is precisely the point.
- The sponge is protected — buried in the cool zone of the soil, sheltered from direct evaporation and wind. It recharges with rainfall and releases water deeper down, directly into the root zone.
- It reduces watering — this is the main objective in dry climates or on fast-draining soil.
- It limits runoff — a shallow depression captures water instead of letting it run off, which matters on sloping ground.
- But it does not drain — and that is its absolute limitation, detailed below.
Choose
| Situation | Suitable form | Why |
|---|---|---|
| Clayey, heavy, poorly drained soil | Raised | Drainage and warming address the two main defects of these soils. |
| Humid climate, cool region | Raised | Earlier growth in spring, less winter suffocation |
| High water table, flood-prone land | Raised | Historical use, long predating permaculture |
| Sandy, fast-draining soil | Sunken | It already drains too much; the buried sponge corrects exactly this flaw. |
| Dry climate, hot summers | Sunken | Maximum water retention, minimum evaporation |
| Dry sloping land | Sunken, across the slope | Captures runoff instead of suffering from it. |
| Deeply compacted or polluted soil | Raised | Cultivate above it without disturbing the existing soil. |
| Already fertile, well-structured soil | None | A flat mulched bed will produce just as much, with far less work. |
Building a raised mound
The sandwich mound with a wood core, the most common form. Ideally built in autumn, so winter can initiate decomposition.

Dimensions
- Width: 1.20 m maximum — beyond that, you can no longer reach the center without climbing onto it, and compacting a mound defeats its purpose.
- Height: 30 to 60 cm. It will lose one-third of its height in the first year.
- North–south orientation is preferable, so both sides receive sunlight. Paths 50 to 60 cm wide.
The steps
- Mow the vegetation without pulling it up, and water the soil thoroughly. This is the step everyone forgets: dry soil beneath a mound will remain dry for a long time.
- Lay down brown cardboard without printing, with adhesives removed and sheets overlapping by 15 cm. It smothers perennial weeds without herbicide.
- The wood core — 30 to 40 cm of logs, branches, and twigs, from largest to smallest. Compact it to limit large gaps.
- A nitrogen-rich layer — fresh grass clippings, manure, nettles. It balances the carbon in the wood.
- A brown layer — dead leaves, straw, wood chips, 15 to 20 cm deep.
- Soil — 15 to 20 cm of topsoil mixed with mature compost. This is where you will sow.
- Mulch — 5 to 10 cm, immediately. A bare mound erodes with the first rain.
Building a sunken mound
The option for dry climates and fast-draining soil. It requires more earthwork but produces an immediately usable result.

The steps
- Dig a trench 30 to 50 cm deep, 1 to 1.20 m wide. On sloping ground, orient it across the slope so that it intercepts runoff.
- Separate the soils. This is the technical point of the method: set aside the top 20 centimeters — the living topsoil — separately from the poorer subsoil. They will not be put back in the same place.
- Loosen the bottom with a digging fork without turning it over, so that water can continue to drain downward.
- The wood at the bottom — 20 to 30 cm. Here, favor wood that is already dead and partially decomposed, spongy and crumbling under your fingernail: it absorbs immediately, whereas fresh wood takes an entire season. Water it thoroughly before covering it — it must be saturated from the start.
- A nitrogen-rich layer — the same role as in the raised version, and just as essential.
- The subsoil first, then the topsoil on the surface — you recreate the natural layering instead of reversing it.
- Thick mulch, 8 to 10 cm. In dry climates, it is what keeps the sponge from emptying from above.
Cardboard is useless here: the soil placed back on top already smothers the existing vegetation.
The absolute contraindication: never dig in clay soil. A pit in clay behaves like a bathtub — water enters it and does not come back out. The wood then rots anaerobically, producing compounds that are toxic to roots, and you end up with a foul-smelling pocket that cannot be remedied. In clay soil, use the raised version, without exception.
Second cost to accept: by digging, you destroy the existing structure and the area's mycorrhizal network. It is a one-time investment — you will not need to do it again for ten years — but you need to know this, and it is another reason not to dig soil that is already in good condition.
Which wood to use in both cases
- Excellent — softwoods: poplar, willow, birch, alder, linden. Rapid decomposition.
- Good but slow — oak, beech, fruit trees. A very long-lasting sponge effect.
- Avoid — large quantities of conifers (acidifying and slow to decompose), walnut (growth-inhibiting juglone), black locust and chestnut (rot-resistant, they will never decompose), and any treated, painted, or varnished wood.
Nitrogen hunger: the difficulty no one warns you about
It concerns both forms, and it is the main cause of disappointment in the first year.
Wood is extremely rich in carbon and poor in nitrogen. The microorganisms that decompose it need both: they therefore draw available nitrogen from the surrounding soil to balance their diet. This nitrogen is not lost — it is immobilized in their biomass and will be released later — but in the meantime your crops lack it. Symptom: pale foliage, stunted growth, and weak plants for no apparent reason.
Three solutions:
- The nitrogen layer — that is precisely what it is for. Do not skip it.
- Sufficient soil depth — 15 to 20 cm separates the roots from the wood during the critical period.
- Choosing crops for the first year — legumes, which fix their own nitrogen, and shallow-rooted cucurbits: squash, zucchini, pumpkins, beans, and peas. Avoid hungry leafy vegetables — cabbages, lettuce, and spinach — and long roots.
One advantage of the in-ground version: because the wood is deeper, the seedling zone is somewhat better insulated from the phenomenon.
The first three years

- Year 1 — about one-third settling for the raised version, with possible nitrogen hunger; only suitable crops should be grown. Replenish the mulch during the season.
- Year 2 — the balance settles in. The wood begins to release nutrients, soil life has become established, and the range of crops expands. Generally the best year for yields.
- Year 3 and beyond — maturity: high water retention, stable fertility, and greatly reduced watering. Everything becomes cultivable.
Maintenance: replenish the surface organic matter every autumn. Never turn it over — the layering you built is precisely what makes the whole system work. Allow five to ten years before rebuilding; by then, the core wood will have become humus.
The other variations
- Lasagna mound — no wood, just alternating brown and green layers. Faster, lower, and settles more. A good solution if you have no wood.
- Round “keyhole” mound — circular, with an access notch in the center. Excellent cultivated-area-to-path ratio, suitable for small spaces.
- Edged mound — contained by boards or logs. Neater, with less erosion, but less side-slope surface area.
- Simple raised bed — 20 cm of improved soil without a wood core. No sponge effect, but immediately plantable without nitrogen hunger.
Frequently asked questions
Buried or raised—what if I can't decide?
Ask yourself one question: is your problem excess water or a lack of it? If your crops suffer in winter, raise the mound. If they suffer in July, bury it. And if your soil is clayey, the answer is raised, whatever the climate.
Do you need to remove the grass before building?
For the raised version, no: mow the grass very short and cover it with cardboard; the smothered grass becomes organic matter, and its dead roots leave useful channels. With the buried version, the question does not arise because you strip the area.
Can you build one in spring?
Yes, but nitrogen hunger will be more pronounced, as decomposition will not have had the winter to get started. Increase the nitrogen-rich layer and limit yourself to squashes and beans during the first season.
Do mounds attract voles?
The gaps in the wood core can shelter them, especially in the raised version. Two countermeasures: compact the wood properly, and lay fine-mesh wire on the ground before the cardboard if pressure is high.
What is the difference from the Hügelkultur method?
It is the same principle. The German term Hügelkultur refers to a wood-core mound, a practice documented in Central Europe long before permaculture adopted it. The two variants, raised and buried, already coexist there.
How long does it take to build one?
A good half-day for two people to build a 5 m mound, excluding material collection. Allow twice as long for the buried version because of the excavation. Start with just one: you will then know whether the method suits your land before building ten.
Can you build a mound on a terrace or slab?
Yes, in a raised-edged version with a drainage layer at the base. Watch the weight: a water-saturated 5 m² mound weighs several tons. Reserve it for ground-level slabs.
Key takeaway
The mound is not a symbol; it is a response to a specific problem—and there are two. Raise it to improve drainage, bury it to retain water, and do neither if your soil is already doing well. In both cases, plan for the first year: it is the year that discourages those who were not warned.
To go further
- The different types of soil: how to recognize and improve them
- Creating a vegetable garden without irrigation: mulch, ground cover, and mulching
- The basics of living soil
- How do you create a permaculture vegetable garden?
For the first year of your mound: our vegetable seeds—squashes, zucchini, and beans in particular—and our green manures to cover the sides.

Leave a comment
This site is protected by hCaptcha and the hCaptcha Privacy Policy and Terms of Service apply.